Wednesday 17 August 2016

Using BDD for State Transition diagram testing

Overview

In Agile software development lifecycle, Behaviour Driven Development (BDD), proved to be a useful testing technique to define the test cases based on the expected behaviour of the software. On of the main characteristics is that the defined test steps follow the below pattern :
Given some initial context,
When an even occurs
Then ensure some outcomes
This technique is used and there are many examples on the web on how to use it, found in different places :
To get the maximum value from the usage of this technique, the following guidelines were proposed :
  • Describe what not how, e.g. it is not particularly useful to define all the 'clicks' and 'reloads' to validate a user story
  • One test, one topic, each test should ideally be focused on one topic and each topic should be ideally described by one test. Otherwise, a test that validates multiple actions, it will be fragile and will cause a lot of maintenance. 

The problem

When it comes to test workflows that involve different personas interacting with the application, it might be a challenge to create from scratch a complete test case to test the valid or non-valid transactions. 

For instance, lets consider a web based application that implements the following workflow transition diagram :


1. When a customer submits successfully a form and the 'customer case' object is created and its status is moved to 'Open'
2. When the analyst assigns to himself the case, the 'customer case' status is moved to 'In progress'
3. When the analyst completes his work, the status is moved to 'Done'
4. When a customer case is in 'Done' state, an approver may move the case to 'Rejected' state or 'Approved' state. 
5.a If 'Rejected', the analyst can reassign the case to himself/herself by moving the status to 'In progress'
5.b If 'Approved', the customer report is delivered to the customer 

To automatically test this workflow however, inevitably it will involve :
  • logging in and logging out as Customer/Analyst/Approver
  • Submitting a form (e.g. typing into text fields, selecting options)
  • Clicking of buttons or even
  • Checking if previously submitted information is present
  • Uploading or Downloading a file, or even 
  • Receiving email notifications

Writing the test cases

Considering the above, the use of the  'State Transition Testing' black box testing technique would enable the tester to cover all the valid and invalid state transitions. Following that technique, we would be more focused on the verification of the overall completion of the workflow rather than of the interaction of each particular element.

Possible risks by using this technique are 
  1. the execution time of a test case might be long since the complete application/system will need to be used, and 
  2. the test case might be too fragile in case of a WebUI change
Considering the above, we avoided to design too descriptive test cases like this one :

Scenario : Verify Open > In progress > Done > Approved  path
Given I log in as customer
When I click the button 'Request a case'
And I fill in the requested form
And I submit successfully the form
And I log out
Given I log in as analyst
When I click on the submitted case page
And I assign the case to myself
And I compete the case analysis by uploading a PDF report
Then I check the case is on 'Done' state
And I log out
Given I log in as approver
When I click on the submitted case page
And I approve the customer case
Then I check the case is on 'Approved' state
And I log out
Instead, this is how we actually design the test case:
Scenario : Verify Open > In progress > Done > Approved path
Given as a customer, I submit successfully a case
When as an analyst, I assign the case to myself
Then as an approver, I approve the case

Implementation and libraries

For the purpose of this article, we use the python-behave , a BDD implementation in Python style.

In our second test case description, we created 3 'high level' test steps in order to cover the 'Open' to 'In progress' to 'Done' path. These 'high level' steps they use and execute 'lower level' steps with the help of the method context.execute_steps. This method allows you to execute inside a step another step that was defined elsewhere.

For instance, the step 'Given as a customer, I submit successfully a case' could have the following definition :

@given('as a customer, I submit successfully a case')
def step_impl(context):
      context.execute_steps('''Given I log in as customer''')
      context.execute_steps('''When I click the button 'Request a case'''')
      context.execute_steps('''When I fill in the requested form''')
      context.execute_steps('''When I submit successfully the form''')
      context.execute_steps('''When I log out''')

Conclusions
 It is important to think about what we want to achieve with the  BDD test case. So when it comes to verify long and complex state machine diagrams, for the benefit of the tester or the reviewer it could be more convenient to structure the test case with as simple steps as possible.  

Sunday 22 May 2016

Raspberry pi 3 + Angel Sensor : Hello Temperature, Heart Rate, Steps Count !

Steps 

The code is stored at a public repo at GitHub.

1. Get a clone of the repository
  $ git clone https://github.com/vaggos2002/py-angel-sensor

2. Change your current directory
    $ cd py-angel-sensor

3. Install the required libraries  on your raspberry pi 3 :
  $ sudo apt-get install pip
  $ sudo pip install requirements

4. Press the Angel Sensor button to start the sensor for 2 secs.

5. Press the Angel Sensor button to start the HR measurements for 10 secs.

6.  Run the code
  $ ./main.py -a '<angel sensor mac address >' -T (for temperature) -H (for heart rate) -S (for steps count)
  e.g. :  ./main.py -a '00:07:80:02:F3:8C' -H -S
After the last step, you should start to see at your terminal the following measurements :

Expected outcome of the script


Monday 2 May 2016

Charging the Angel Sensor M1

In brief 

The new Angel Sensor M1 is developed exclusively for developers. Compared to the previous Angel Sensor device, it seems to me this one to be simplified in terms of user interface. In fact, it has a button that can be used by the end-user , some lights and vibration.

As an user, I am a little bit confused every time that I try to re-charge it, therefore I decided to create here the instructions

Instructions

1. Connect the Angel Sensor to your USB 
2. Press its button for more that 10 seconds until you feel the vibration and the lights to be turned on
3. Done ! 


Raspberry pi 3 + Angel Sensor : Hello temperature !

In brief

The trend of open data i.e. data to be freely available to everyone to use and republish as they wish until recently was not obvious in the IoT wearable industry. Consumable wearable industry quite often enables restrictions and limits even when it comes to the use of your own health related data (e.g. see Withigs Terms of Use - 7. Duration - Termination - Free of charge).

Another alternative could be the usage of wearable devices that allow you to get your personal health data directly from the device i.e via Bluetooth.

Infrastructure and the Angel Sensor 

The Angel Sensor is a wearable designed to allow direct access via Bluetooth. In short, the AGL-M1 model has sensors to measure the temperature, the heart rate, the acceleration, and the blood oxygen saturation (under development) .

In this tutorial, we will try get the temperature measurements by using a raspberry pi 3 running Raspbian Jessie Lite.
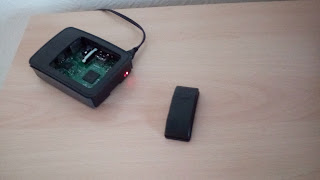
The raspberry pi 3 and the Angel Sensor M1

Steps 

The code is stored at a public repo at GitHub.

1. Get a clone of the repository
  $ git clone https://github.com/vaggos2002/py-angel-sensor

2. Change your current directory
    $ cd py-angel-sensor

3. Install the required libraries  on your raspberry pi 3 :
  $ sudo apt-get install pip
  $ sudo pip install requirements

4. Press the Angel Sensor button to start the Sensor.

5.  Run the code
  $ ./temp.py -a '<angel sensor mac address >'
  e.g. :  ./temp.py -a '00:07:80:02:F3:8C'

After the last step, you should start to see at your terminal the temperature in Celsius :

Expected outcome of the script

Tuesday 26 April 2016

Setting up an SSH server on Windows

The problem 

Consider the following scenario :
  • There is a desktop application that it is running across different operating systems : Windows, Linux, OSX (Mac). 
  • We designed a test case which its steps are able to be executed by commands on the terminal (on linux and OSX) or at the command-line (on Windows). We need to automate the execution of that test case in all operating systems by triggering and executing the operating-system specific commands from a central linux server (let's name it the 'test server')
  • In our test lab environment, there is a test server (VM running Ubuntu) and three test devices that run the 3 different operating systems (e.g. Windows 7, Ubuntu 14, OSX 10.11)

The solution

Installing an SSH server  is a nice way to enable the cross platform communication from the test-server. Until the official release of the SSH integration with the PowerSell on Windows, we decided to go with the FreeSSHd desktop software to set up the SSH server on windows.

Installation steps :
  1. Download the latest freeSSHd version 
  2. Install the application without installing its service
  3. Start freeSSHd as administrator
  4. Open the freeSSHd settings window and add a new user with login and password 'demo', authorization type 'Password stored as SHA1 hash' and with checked Shell and SFTP  (Figure 1).
  5. Go to the 'Authentication' tab and select Password authentication to 'Required' and Public key authentication to 'Disabled'
  6. Restart the application as administrator and make sure that the SSH server is running (Figure 2)
  7. And you are done !

Figure 1 : Create a user account

Figure 2 : SSH server status


Sunday 20 March 2016

Pairing Bluetooth Keyboard with Raspberry Pi 3, without GUI

In brief 

The latest Raspberry Pi 3 now comes with its own built in  Bluetooth 4.1/Low Energy (LE) support. Here below, I just share how I did the pairing between my bluetooth keyboard and the raspberry pi.

Infrastructure  

- Raspberry Pi 3, running Raspbian Jessie Lite
- Bluetooth Keyboard (in my case Active Strike Pro mini )
- On my laptop, I run Debian 8
- The Raspberry Pi 3 (rpi) is already connected through the Wi-Fi and it has a static local IP assigned (192.168.0.28). Therefore I could accept any time the rpi via SSH :
  $ ssh pi@192.168.0.28


Steps

1. Install the BlueTooth library on rpi as a 'pi' user :
 $ sudo apt-get update
 $ sudo apt-get upgrade
 $ sudo apt-get install bluetooth


2. On the rpi, start the interactive bluetoothctl command line (as a pi user NOT AS ROOT):
 $ bluetoothctl -a
 [NEW] Controller B8:27:EB:1A:8A:A7 raspberrypi [default]
 Agent registered
 [bluethooth]# 

 3. Power up the controller:
  [bluethooth]# power on
  Changing power on succeeded
  [CHG] Controller B8:27:EB:1A:8A:A7 Powered: yes

 4. Set the controller to look only for keyboards:
  [bluethooth]# agent KeyboardOnly
  Agent registered

5. Set the controller to make the keyboard as a default agent:
  [bluethooth]# default-agent
  Default agent request successful
6. Set the controller in the 'pairable' mode:
  [bluethooth]# pairable on
  Changing pairable on succeeded

7. Enable the 'pairing mode' of your Bluetooth Keyboard (in Active Strike Pro mini, by pressing :  Fn + C) and scan with your rpi controller:
  [bluethooth]# scan on
  Discovery started
  [CHG] Controller B8:27:EB:1A:8A:A7 Discovering: yes
  [NEW] Device 20:73:00:16:12 Bluetooth 3.0 Keyboard 
  ... 

8. Do the pairing, wait for the PIN code:
  [bluethooth]# pair 20:73:00:16:12
  Attempting to pair with 20:73:00:16:12
  [CHG] Device 20:73:00:16:12 Connected: yes
  [agent] PIN code: 785148
9. Quickly, type the PIN code on the keyboard and press Enter:
  [CHG] Device 20:73:00:16:12 Modalias: usb:v04E8p7021d011B
  [CHG] Device 20:73:00:16:12 UUIDs
           0001000-0000-8000-00805f9b34fb
  [CHG] Device 20:73:00:16:12 Paired: Yes   
  Pairing successful  

10. Make the device a trusted device
  [bluethooth]# trust 20:73:00:16:12
  [CHG] Device 20:73:00:16:12 trust succeeded
  Changing 20:73:00:16:12 trust succeeded

11. Connect to the device
  [bluethooth]# connect 20:73:00:16:12
  Attempting to connect with 20:73:00:16:12 

  [CHG] Device 20:73:00:16:12 Connected: yes
  Connection successful

12. Leave the bluetoothctl command line
  [bluethooth]# quit

Done !